About This Tiffy the Sleepy Unicorn Amigurumi Pattern
Tiffy makes a showstopper handmade gift — she's distinctive enough that whoever receives her will immediately ask "did you make that?" and be genuinely amazed you did.
Ideal for those with basic crocheting experience, featuring slightly more advanced stitches and techniques to expand your skills.
Takes 5-7 hours, making it an enjoyable project to finish over a couple of days.
Playful characters full of personality, designed to spark imagination and become cherished playtime favorites.
Tiffy makes a showstopper handmade gift — she's distinctive enough that whoever receives her will immediately ask "did you make that?" and be genuinely amazed you did.
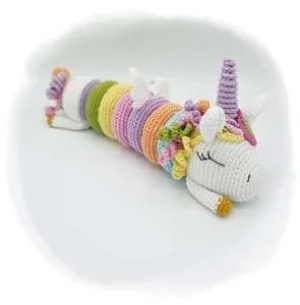
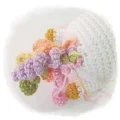
I fell hard for this pattern the moment I saw that donut ring construction. I'd never made anything modular like this before — where the body pieces literally slide onto a central pillar — and honestly it felt like a little puzzle coming together. There's something so satisfying about watching those colorful rings stack up one by one. The mane is my favorite part to attach; alternating the short and long curls gives this wild, romantic look that photographs beautifully. I kept stopping just to hold it up and stare at it.


I want to tell you about the moment this pattern completely won me over, because it wasn't when I finished — it was somewhere around the third donut ring.
I'd been crocheting along, skeptical about whether a unicorn made of stackable rings was going to look as magical as the photos suggested. And then I slid that third ring onto the pillar, held it up, and just... laughed. That good kind of surprised laugh. Because it actually works. The silhouette is genuinely unlike anything I'd made before — this long horizontal body, colorful rings all stacked up, little hooves peeking out at each end. It looks like something from a dream.
The construction is smart in ways I didn't expect. Working the pillar in the round and stuffing as you go means you never have to wrestle fiberfill into a narrow tube. The donut rings close by stitching the first and last rounds together — simple, satisfying, and they hold their round shape beautifully. And the horn! That BLO-then-FLO slip-stitch trick for the spiral is one of those techniques that feels fiddly for about thirty seconds and then suddenly makes perfect sense.
If I were making a second Tiffy, I'd go full jewel tones — deep teal, magenta, emerald, gold — instead of the pastel rainbow. The white body would make those saturated colors pop even more. You could also try making the mane all in one color for a more graphic, modern look rather than the multicolor version.
Make this one. It's the pattern people will ask about every single time.
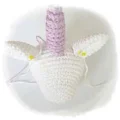
Meet Tiffy — the most endearingly drowsy unicorn you'll ever hook up. She lays flat on her tummy, her little legs tucked under her, rainbow mane cascading down her side, and that long colorful body made of stackable donut rings that slide right onto her pillar. This pattern is genuinely unlike anything I've seen in the amigurumi world, and the construction is so clever it'll make you grin the whole time you're making it. Your finished Tiffy will measure about 29 cm long and 13 cm tall with her spiral horn — the perfect size for a shelf, a gift bag, or honestly just your own desk.
Use any color of your choice. Chain 24, then join to the first chain with a sl st — be careful not to twist the chain.
ch 1, sc in the same space as the joining sl st, sc all the way around, join with sl st. [24]
ch 1, (3 sc, inc) x 6, join with sl st. [30]
Switch to a new color of your choice.
ch 1, 2 sc, inc, (4 sc, inc) x 5, 2 sc, join with sl st. [36]
ch 1, (5 sc, inc) x 6, join with sl st. [42]
ch 1, 3 sc, inc, (6 sc, inc) x 5, 3 sc, join with sl st. [48]
Switch to a new color of your choice.
ch 1, sc around, join with sl st. [48]
ch 1, sc around, join with sl st. [48]
ch 1, sc around, join with sl st. [48]
ch 1, sc around, join with sl st. [48]
Switch to a new color of your choice.
ch 1, (6 sc, dec) x 6, join with sl st. [42]
ch 1, 2 sc, dec, (5 sc, dec) x 5, 3 sc, join with sl st. [36]
ch 1, (4 sc, dec) x 6, join with sl st. [30]
Switch to a new color of your choice.
ch 1, (3 sc, dec) x 6, join with sl st. [24]
ch 1, sc around, join with sl st. [24]
Fasten off, leaving a long tail for sewing. Thread your needle and sew Rnd 1 to Rnd 14 together, stuffing the ring firmly with fiberfill before you close it up completely.
Work with white yarn throughout this section.
6 sc in a magic ring. [6]
6 inc. [12]
(sc, inc) x 6. [18]
sc, inc, (2 sc, inc) x 5, sc. [24]
(3 sc, inc) x 6. [30]
sc around. [30]
sc around. [30]
12 sc, 6 inc, 12 sc. [36]
12 sc, (sc, inc) x 6, 12 sc. [42]
12 sc, (2 sc, inc) x 6, 12 sc. [48]
13 sc, inc, (3 sc, inc) x 5, 14 sc. [54]
sc around. [54]
sc around. [54]
sc around. [54]
sc around. [54]
sc around. [54]
sc around. [54]
sc around. [54]
13 sc, dec, (3 sc, dec) x 5, 14 sc. [48]
12 sc, (2 sc, dec) x 6, 12 sc. [42]
12 sc, (sc, dec) x 6, 12 sc. [36]
(4 sc, dec) x 6. [30]
2 sc, dec, (3 sc, dec) x 5, sc. [24]
Stuff the head firmly with fiberfill before continuing.
(dec, 2 sc) x 6. [18]
Fasten off, leaving a long tail. Run your needle through the front loop of each remaining stitch and pull tight to draw the opening closed. Weave in the tail securely.
Begin with white yarn.
6 sc in a magic ring. [6]
6 inc. [12]
(sc, inc) x 6. [18]
sc, inc, (2 sc, inc) x 5, sc. [24]
(3 sc, inc) x 6. [30]
2 sc, inc, (4 sc, inc) x 5, 2 sc. [36]
(5 sc, inc) x 6. [42]
3 sc, inc, (6 sc, inc) x 5, 3 sc. [48]
sc around. [48]
sc around. [48]
sc around. [48]
sc around. [48]
sc around. [48]
sc around. [48]
Switch to a color of your choice.
(6 sc, dec) x 6. [42]
3 sc, dec, (5 sc, dec) x 5, 2 sc. [36]
(4 sc, dec) x 6. [30]
Switch to a new color of your choice.
sc, dec, (3 sc, dec) x 5, 2 sc. [24]
(2 sc, dec) x 6. [18]
Stuff the butt firmly with fiberfill. Fasten off and weave in ends. Using both thumbs, press the center of the stuffing inward to create a cavity that is wide and deep enough to receive the inside-of-the-butt insert.
Use any color of your choice.
6 sc in a magic ring. [6]
6 inc. [12]
(sc, inc) x 3. [18]
sc around. [18]
sc around. [18]
sc around. [18]
sc around. [18]
sc around. [18]
sc around. [18]
sc around. [18]
Fasten off, leaving a long tail. Sew this insert piece into the cavity of the butt.
Use any color of your choice. Stuff the pillar continuously as you work — don't wait until the end.
6 sc in a magic ring. [6]
6 inc. [12]
(3 sc, inc) x 3. [15]
sc around. [15]
sc around. [15]
sc around. [15]
sc around. [15]
sc around. [15]
sc around. [15]
sc around. [15]
sc around. [15]
sc around. [15]
sc around. [15]
sc around. [15]
sc around. [15]
sc around. [15]
sc around. [15]
sc around. [15]
sc around. [15]
sc around. [15]
sc around. [15]
sc around. [15]
sc around. [15]
sc around. [15]
sc around. [15]
sc around. [15]
sc around. [15]
sc around. [15]
sc around. [15]
sc around. [15]
sc around. [15]
sc around. [15]
sc around. [15]
sc around. [15]
sc around. [15]
sc around. [15]
sc around. [15]
sc around. [15]
sc around. [15]
sc around. [15]
sc around. [15]
sc around. [15]
sc around. [15]
sc around. [15]
sc around. [15]
sc around. [15]
sc around. [15]
Before cutting the yarn, slide all six donut rings and the butt onto the pillar to verify the length fits correctly. Fasten off, leaving a long tail for sewing to the head.
Start with yellow-gold yarn for the hoof section.
6 sc in a magic ring. [6]
(sc, inc) x 3. [9]
sc around. [9]
Switch to white yarn.
sc around. [9]
sc around. [9]
sc around. [9]
sc around. [9]
sc around. [9]
sc around. [9]
sc around. [9]
sc around. [9]
sc around. [9]
sc around. [9]
sc around. [9]
Stuff the leg with fiberfill.
Press the opening flat and work sc through both layers across the next 4 stitches to close the top of the leg. Fasten off, leaving a long tail for sewing.
Use any color of your choice.
4 sc in a magic ring. [4]
(sc, inc) x 2. [6]
Switch to BLO for the next round — all remaining increases in the horn are worked through the back loop only to create the spiral texture.
BLO: (2 sc, inc) x 2. [8]
BLO: (3 sc, inc) x 2. [10]
BLO: (4 sc, inc) x 2. [12]
sc around. [12]
sc around. [12]
sc around. [12]
sc around. [12]
sc around. [12]
sc around. [12]
sc around. [12]
Join with sl st, ch 1, turn. Now switch to FLO — work sl st through the front loop only of every stitch from Rnd 12 back down to Rnd 3. This creates the decorative spiral ridge on the outside of the horn.
Fasten off, leaving a long tail for sewing. Stuff the horn with fiberfill before attaching.
Use any color of your choice. Make 5 short mane curls.
Ch 30.
Starting from the 2nd chain from the hook, work inc in every st to the end of the chain. Fasten off, leaving a long tail for sewing.
Use any color of your choice. Make 5 long mane curls.
Ch 40.
Starting from the 2nd chain from the hook, work inc in every st to the end of the chain. Fasten off, leaving a long tail for sewing.
Use any color of your choice. Make 5 tail curls.
Ch 30.
Starting from the 2nd chain from the hook, work inc in every st to the end of the chain. Fasten off, leaving a long tail for sewing.
Use white yarn. Ch 6.
Starting from the 2nd chain from the hook: 4 sc, then 5 sc into the last chain stitch, continue working around to the other side of the foundation chain, 2 sc, ch 1, turn. [11]
3 sc, 3 inc, 5 sc, ch 3, turn. [14]
Starting from the 2nd chain from the hook: 2 sc, then 12 sc across, ch 1, turn. [14]
2 sc, 3 inc. [8]
Fasten off invisibly, leaving a long tail for sewing.
Use white yarn.
6 sc in a magic ring. [6]
(sc, inc) x 3. [9]
(2 sc, inc) x 3. [12]
(3 sc, inc) x 3. [15]
(4 sc, inc) x 3. [18]
sc around. [18]
sc around. [18]
sc around. [18]
sc around. [18]
(sc, dec) x 6. [12]
Flatten the ear opening and work sc through both layers across all 6 remaining stitches to close. Fold the ear gently and tack with a few stitches to hold the shape. Fasten off, leaving a long tail for sewing.
Tiffy is one of those projects that genuinely surprises you as it comes together — you start with a pile of colorful donut rings and a long stuffed pillar, and then suddenly you've got this absurdly charming sleepy unicorn laying across your lap. 🦄 She's the kind of finished object that stops people in their tracks. Make her in pastels, in jewel tones, in whatever colors make you happy — she handles every palette beautifully. Whether she ends up on a nursery shelf, gifted to a unicorn-obsessed friend, or just proudly displayed on your own desk, Tiffy is absolutely worth every round. Happy hooking! 🌈🧶
Yes, but the feel and drape will be different. The pattern calls for a mercerised cotton at 50g/125m, which gives a smooth, slightly firm fabric that holds the donut ring shape well. An acrylic DK at a similar weight will work, but the rings may feel a little squishier and the stitch definition won't be quite as crisp. Stick to 2.5mm hook regardless.
The pattern specifically tells you to do a test fit before cutting — slide all six donut rings onto the pillar and hold the butt up to the open end. You want the rings to fill the pillar snugly with just enough room for the butt to sit flush. If the pillar is too short, the rings won't all fit. Too long and Tiffy will look saggy in the middle. Don't skip this check.
The invisible decrease means inserting your hook through only the front loops of the next two stitches before pulling through and completing the decrease as normal. It hides the decrease much better than the standard method, especially on white yarn where a regular dec bump is really obvious. The pattern notes recommend it strongly, and I agree — it's worth the extra half-second per stitch.
The horn has two phases. First, Rnds 3–5 are worked through the back loop only, which leaves the front loops exposed in a ridge. Then after completing Rnd 12 you turn and slip-stitch back down through those exposed front loops from Rnd 12 all the way to Rnd 3. This creates the raised spiral wrapping the outside of the horn. It looks complicated but it's just one pass of slip stitches — take it slowly and it clicks quickly.
You can — dropping to a lace-weight cotton with a 2mm hook would produce a noticeably smaller unicorn, but keep in mind that the pillar already has 47 rounds, and the proportions between the donut rings and the pillar diameter are carefully balanced. If you scale down, check your donut ring's center hole is still wide enough to slide over your thinner pillar before you've made all six.
