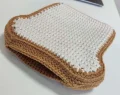
🧢 Beautiful ✨ Detailed πŸ’ Adorable

Toastie Bread Bag Amigurumi Pattern

Toastie Bread Bag Amigurumi Pattern
4.1β˜…Rating
3-5 HoursTime Needed
4.1KMade This
βœ‚οΈ

Intermediate Level

Ideal for those with basic crocheting experience, featuring slightly more advanced stitches and techniques to expand your skills.

⏱️

Quick Craft

Fits nicely into a free afternoon β€” 2 to 5 hours of focused, enjoyable crocheting.

🐰

Whimsical Buddy

Playful characters full of personality, designed to spark imagination and become cherished playtime favorites.

About This Toastie Bread Bag Amigurumi Pattern

Toastie Bread Bag Amigurumi Pattern crochet pattern - detailed view

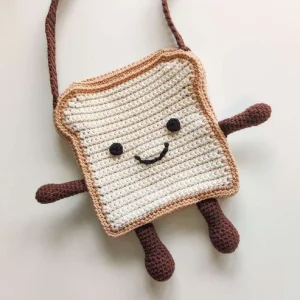
This bag is the ultimate conversation starter and makes a brilliant gift for anyone who loves quirky accessories or just really appreciates a good piece of toast. It's perfectly sized for a phone and a small wallet.

Why You'll Love This Toastie Bread Bag Amigurumi Pattern

I love how this isn't just a toyβ€”it's actually functional! The way the crust is worked directly onto the panels makes it so much sturdier than a flat bag. Plus, getting to toast your edges with that light brown yarn is weirdly therapeutic and makes the whole piece pop.

Toastie Bread Bag Amigurumi Pattern step 1 Toastie Bread Bag Amigurumi Pattern step 2 Toastie Bread Bag Amigurumi Pattern step 3 Toastie Bread Bag Amigurumi Pattern step 4

Switch Things Up

I remember the first time I saw a bread plushie onlineβ€”I was totally smitten! There's just something about inanimate objects with tiny legs that gets me every time. When I sat down to write this pattern, I really wanted to make sure it wasn't just a flat pouch. That's why we do the crust rounds; it gives the bag that thick-cut sourdough vibe that makes it look like a real slice of toast.

One little tip from my personal stash: if you find the standing single crochet at the start of the crust a bit fiddly, don't sweat it! You can always join with a regular slip stitch and a chain one, though the standing stitch does give a much cleaner edge. Also, feel free to play with the face. I’ve seen some testers give theirs little pink cheeks with a bit of blush or pink yarn, and it’s honestly the cutest thing ever. This project is all about having fun and not taking things too seriously. I hope making this brings a huge smile to your face! I promise it is a quick make once you get the hang of the shaping and the personality starts to shine through.

Common Mistakes & How to Fix Them

βœ— When you're working the sc blo for the crust, if you don't catch the back bump as well as the back loop, the wall of your bag might feel a bit flimsy or stretch too much under weight.βœ— It's really easy to accidentally sew the arms on at different heights; I always suggest using stitch markers to pin them exactly level with the mouth before you pick up your needle.βœ— If your tension is too loose on the sling strap, it will grow significantly once you put items inside, so keep those stitches nice and snug or consider lining it with ribbon.βœ— When joining the two slices, if you don't align the stitch markers for the opening correctly, your bag might end up looking a bit lopsided or the opening might be too narrow.

Toastie Bread Bag Amigurumi Pattern

This quirky little project is basically a hug in bag form. If you've been looking for a way to carry your essentials while looking absolutely adorable, you've found it. We're making two soft slices and joining them with a sturdy crust that gives the bag its signature 3D shape. It's such a satisfying make because you see the personality come through the moment those tiny limbs and that sweet smile are added to your work!

Intermediate 3-5 Hours

Materials Needed for Toastie Bread Bag Amigurumi Pattern

β€” Main Fabric

  • 01
    Approximately 28g of cream DK weight milk cotton yarn for the bread center
  • 02
    About 21g of light brown DK weight yarn for the crust edging
  • 03
    Around 21g of dark brown DK weight yarn for the limbs and strap
  • 04
    A small amount of black yarn for the facial details

β€” Tools Required

  • 01
    4mm crochet hook (G-6)
  • 02
    3.5mm crochet hook (E-4)
  • 03
    Tapestry needle for sewing and embroidery
  • 04
    Stitch markers to track rounds and placement
  • 05
    Polyester fiberfill stuffing for the arms and legs

Progress Tracker

0% Complete

β€” 1. Front and Back Slices :

Info :

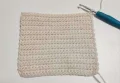
Using cream yarn and the 4mm hook, start by making two identical panels.

Row 1 :

ch 26, sc in 2nd st from hook and in every ch across, ch 1, turn (25)

Row 2-25 :

sc in each st across, ch 1, turn (25)

Row 26 :

inc in first 2 st, sc in each st until 2 st remain, inc in last 2 st, ch 1, turn (29)

Row 27 :

inc in first st, sc in each st until 1 st remains, inc in last st, ch 1, turn (31)

Row 28-29 :

sc in each st across, ch 1, turn (31)

Row 30 :

dec, sc in each st until 2 st remain, dec, ch 1, turn (29)

Row 31 :

sc in each st across, ch 1, turn (29)

Row 32 :

dec 2 times, sc in each st until 4 st remain, dec 2 times, ch 1, turn (25)

Row 33 :

dec, sc in each st until 2 st remain, dec, ch 1, turn (23)

Row 34 :

dec, sc in each st until 2 st remain, dec (21)

Info :

Fasten off the first slice. Repeat all rows for the second slice.

β€” 2. Bread Crust :

Info :

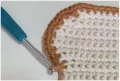
Using light brown yarn and the 4mm hook, we will work around the perimeter of the cream slices.

Round 1 :

Make a standing sc on the top right. sc across the top until 1 st remains, 2 sc in last st. Work 8 more inc along the curve. sc 22 down the side. 3 sc in the bottom corner. sc 23 across the bottom. 3 sc in the next corner. sk 1 st, sc 22 up the side. dec at the start of the curve, then work 8 more inc around the curve back to the start. sl st to join, ch 1.

Round 2 :

sc in the same st as join and in every st around, but place 2 sc in the middle st of each 3-sc corner turn at the bottom. sl st to join, ch 1.

Round 3 :

sc blo in every st around (work through the back loop and the back bump for extra strength). sl st to join, ch 1.

Round 4 :

sc in every st around. sl st to join, ch 1.

Round 5 :

sc in every st around. sl st to join. Fasten off for the first slice; keep yarn attached for the second slice.

β€” 3. Eyes :

Info :

Make 2 using black yarn and the 4mm hook.

Round 1 :

MR, 7 sc into the ring. sl st to the first st to close. Fasten off, leaving a long tail for sewing.

β€” 4. Arms :

Info :

Make 2 using dark brown yarn and the 3.5mm hook. Work in continuous rounds.

Round 1 :

MR, 6 sc (6)

Round 2 :

inc in every st (12)

Round 3-4 :

sc in every st (12)

Round 5 :

(sc, sc, dec) repeat 3 times (9)

Round 6 :

dec, sc in every remaining st (8)

Round 7-14 :

sc in every st (8)

Info :

Add stuffing. Flatten the top and sc or sew the opening shut. Fasten off with a long tail.

β€” 5. Legs :

Info :

Make 2 using dark brown yarn and the 3.5mm hook. Work in continuous rounds.

Round 1 :

MR, 6 sc (6)

Round 2 :

inc in every st (12)

Round 3 :

(sc, inc) repeat 6 times (18)

Round 4-7 :

sc in every st (18)

Round 8 :

(dec, sc) repeat 4 times, sc in next 6 st (14)

Round 9 :

(dec, sc) repeat 3 times, sc in next 5 st (11)

Round 10 :

dec, sc in every remaining st (10)

Round 11-18 :

sc in every st (10)

Info :

Add stuffing. Flatten the top and sc or sew the opening shut. Fasten off with a long tail.

β€” 6. Sling Strap :

Info :

Using dark brown yarn and the 4mm hook.

Row 1 :

ch 6, sc in 2nd ch from hook and in each ch across, ch 1, turn (5)

Row 2 :

sc in every st across, ch 1, turn (5)

Info :

Repeat Row 2 until the strap reaches your desired length. Fasten off leaving a long tail.

Assembly Instructions

  • Position the two black eyes on the front cream panel between Rows 18 and 19, spacing them about 6 to 7 stitches from each side.
  • Using a tapestry needle and black yarn, embroider a curved smile centered between the eyes, sewing over it twice to create a thick, friendly line.
  • Align the two slices back-to-back and sc them together through the crust edge, leaving a 23-stitch opening at the top of the bag.
  • Sew the arms vertically onto the sides of the crust so they sit at the same level as the mouth.
  • Attach the legs to the bottom crust by crocheting through both the leg top and the bag edge across 4 stitches for a sturdy join.
  • Turn the bag right-side out and securely sew each end of the long strap to the inner sides of the crust opening.

Important Notes

  • πŸ’‘Choose a non-stretchy cotton yarn to ensure the bag keeps its shape and doesn't sag when you fill it with your belongings.
  • πŸ’‘When working the crust rounds, always start your first sc of the round in the same stitch where you made your joining slip stitch.
  • πŸ’‘You can customize the depth of your bag by adding extra rounds of sc (like repeating Round 4) to the crust section of both slices.
  • πŸ’‘To make the bag even more functional, consider sewing in a fabric lining or adding a zipper or button closure at the top opening.
  • πŸ’‘If the strap feels too narrow, you can increase the starting chain count, but remember to keep your stitches tight to minimize stretching.

I honestly can't wait for you to finish your Toastie! There's something so joyful about carrying a little bread friend around with you. Whether you stick to the classic look or decide to add some jam or avocado patches, I know it's going to turn out amazing. Don't forget to take your time with the facial featuresβ€”that's where the magic really happens. Happy hooking, and enjoy your new carb-loaded companion! 🧢🍞✨

You ask,

we answer.

FAQs

How can I make the bag sturdier for heavy items?

Using a 100% cotton yarn is the best way to prevent stretching. You can also reinforce the strap by sewing a piece of non-stretch ribbon to the underside.

Can I use safety eyes instead of crocheted ones?

Definitely! 10mm safety eyes would look adorable. Just make sure to attach them to the front panel before you join the two slices together.

What if I want a longer or shorter strap?

Since the strap is just a simple repeat of Row 2, you can just keep crocheting until it fits you perfectly. Just keep in mind it will stretch slightly when worn.

The legs seem a bit floppy, how do I fix that?

The pattern suggests crocheting the legs onto the body rather than sewing. This provides much more support and helps them stay in a cute, slightly forward-facing position.