About This Totoro Little Lamp Amigurumi Pattern
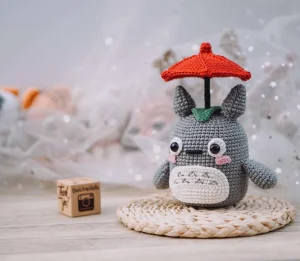
Style this on a bookshelf or a nightstand—this functional Totoro lamp adds a soft, magical glow to any room and makes the most thoughtful handmade gift for Ghibli fans.
Ideal for those with basic crocheting experience, featuring slightly more advanced stitches and techniques to expand your skills.
Takes 5-7 hours, making it an enjoyable project to finish over a couple of days.
Playful characters full of personality, designed to spark imagination and become cherished playtime favorites.
Style this on a bookshelf or a nightstand—this functional Totoro lamp adds a soft, magical glow to any room and makes the most thoughtful handmade gift for Ghibli fans.
I absolutely love how this project blends traditional amigurumi with a bit of 'maker' craft. Working with the LED wire and the wooden umbrella pole makes the whole process feel like you're building something truly special and sturdy. It's so satisfying to click that light on for the first time and see your hard work literally shine!


I have always felt that amigurumi has a certain kind of soul, but adding a light element takes it to a whole new level of whimsy. When I first saw this Little Lamp series, I knew I had to share it with you all. It is not just about the stitches; it is about creating a little atmosphere in your home.
Working with the LED wire might feel a bit intimidating if you have never done it before, but honestly, it is just like adding another strand of yarn. The trick is to keep your tension steady and not to rush the assembly. I found that using a bit of UHU glue really helps keep the pieces exactly where you want them before you commit to sewing.
For the umbrella, don't be afraid to be generous with the glue on the inside. It feels a bit messy at first, but once it dries, that fabric becomes so sturdy and holds its shape perfectly. I chose a bright cherry red for mine, but a soft leaf green would look just as darling. This project is such a fun weekend treat, and seeing Totoro's belly light up for the first time is a total 'wow' moment!
Bring a touch of forest magic into your home with this functional Totoro lamp! This isn't just your typical plushie; it's a clever piece of decor that actually glows. You'll love the way the LED lights create a soft, warm atmosphere from beneath his iconic red umbrella. It's a wonderful project for anyone who wants to combine their love of crochet with a bit of creative DIY engineering.
Work 8 sc into a MR (8)
8 sc around (8)
8 sc around (8)
Repeat [sc, inc] 4 times (12)
Repeat [sc, inc] 6 times (18)
Repeat [2 sc, inc] 6 times (24)
Repeat [3 sc, inc] 6 times (30)
Repeat [4 sc, inc] 6 times (36)
Repeat [5 sc, inc] 6 times (42)
Repeat [6 sc, inc] 6 times (48)
Repeat [7 sc, inc] 6 times (54)
Repeat [8 sc, inc] 6 times (60)
Repeat [9 sc, inc] 6 times (66)
66 sc around (66)
Repeat [10 sc, inc] 6 times (72)
Repeat [11 sc, ch 1, popcorn, ch 1] 6 times, then slst to first st to close (72)
Tie off and weave in your ends. For extra durability, paint the underside of the umbrella with a thin layer of white glue and let it dry over a bottle for 4-5 hours to stiffen.
Work 6 sc into a MR (6)
6 inc around (12)
Repeat [sc, inc] 6 times (18)
Repeat [2 sc, inc] 6 times (24)
Repeat [3 sc, inc] 6 times (30)
Repeat [4 sc, inc] 6 times (36)
Repeat [5 sc, inc] 6 times (42)
Repeat [6 sc, inc] 6 times (48)
Repeat [7 sc, inc] 6 times (54)
Repeat [8 sc, inc] 6 times (60)
60 sc around (60)
60 sc around (60)
Pause here to install the base. Glue a 60-65mm circle of cardboard or felt to the inside bottom to keep it flat.
60 sc around (60)
60 sc around (60)
60 sc while working over the LED cable so the USB connector sticks out of the back (60)
60 sc around (60)
60 sc around (60)
60 sc around (60)
60 sc around (60)
60 sc around (60)
60 sc around (60)
12 sc, place Mark1, 6 sc, place Mark1, 24 sc, place Mark1, 6 sc, place Mark1, 12 sc (60)
60 sc around (60)
60 sc around (60)
60 sc around (60)
28 sc, place Mark2, 4 sc, place Mark2, 28 sc (60)
60 sc around (60)
60 sc around (60)
60 sc around (60)
4 sc, dec, repeat [8 sc, dec] 5 times, 4 sc (54)
54 sc around (54)
Repeat [dec, 7 sc] 6 times (48)
48 sc around (48)
Insert your weight bag and center the LED wires. Begin stuffing firmly around the wires.
3 sc, dec, repeat [6 sc, dec] 5 times, 3 sc (42)
Repeat [dec, 5 sc] 6 times (36)
2 sc, dec, repeat [4 sc, dec] 5 times, 2 sc (30)
Repeat [dec, 3 sc] 6 times (24)
Repeat [dec, 2 sc] 6 times (18)
9 dec (9)
Finish stuffing until the body is firm and holds its shape under pressure. Fasten off and hide the tail.
Work 6 sc into a MR (6)
6 inc around (12)
Repeat [sc, inc] 6 times (18)
18 sc around (18)
18 sc around (18)
18 sc around (18)
18 sc around (18)
Repeat [4 sc, dec] 3 times (15)
15 sc around (15)
Repeat [3 sc, dec] 3 times (12)
12 sc around (12)
Fasten off leaving a long tail. Stuff lightly up to Round 8, flatten the opening, and sew shut.
Work 6 sc into a MR (6)
Repeat [sc, inc] 3 times (9)
9 sc around (9)
Repeat [2 sc, inc] 3 times (12)
12 sc around (12)
Repeat [3 sc, inc] 3 times (15)
Repeat [4 sc, inc] 3 times (18)
18 sc around (18)
9 dec (9)
9 sc around (9)
Work 5 sc across only half the round to create a shaped base (5)
Fasten off and leave a tail for sewing. Stuff the ears firmly.
Start with a foundation of 12 ch.
Work 1 ch, then 26 sc around both sides of the foundation chain (26)
inc, 10 sc, 3 inc, 10 sc, 2 inc (32)
3 sc in next st, 12 sc, 3 sc in next st, 3 sc, inc, 2 sc, inc, 4 sc, inc, 2 sc, inc, 3 sc (40)
sc, 3 sc in next st, 14 sc, 3 sc in next st, 6 sc, inc, 4 sc, 2 inc, 4 sc, inc, 5 sc (48)
48 sc around, then slst to first st to finish (48)
ch 8 and slst to first ch to form a ring. Work 6 sc over the chain, ch 6, work 5 sc back down the chain starting in 2nd ch from hook, then work 6 more sc over the ring (22)
ch 2, dc in same st, 2 inc, 2 dc, inc, 2 dc, hdc, 2 sc, ch 2 tip, 2 sc, hdc, 2 dc, inc, 2 dc, inc, dc, inc, slst to close (28)
In MR, work [2 sc, 2 hdc, 5 dc, 2 hdc, 2 sc], then slst to finish (13)
ch 3, then work 3 sc along the chain (3)
Work 12 sc into a MR, ensuring the USB cable is centered through the ring (12)
Repeat [3 sc, inc] 3 times (15)
15 sc around (15)
Repeat [3 sc, dec] 3 times (12)
12 sc around (12)
Repeat [2 sc, dec] 3 times (9)
9 sc around (9)
You've just created a little piece of forest magic! This Totoro lamp is such a rewarding project because it's both a toy and a functional piece of art. Whether it's sitting on your desk or lighting up a nursery, it's bound to bring a smile to anyone who sees it. I hope you enjoyed the process of 'building' as much as the crocheting! The way the light filters through the stitches gives him such a soft, ethereal look. Happy crafting, and may your new neighbor bring you lots of joy and light. 🧶✨
While LED lights stay cool and are generally safe, it is always best practice to never leave handmade electrical items plugged in unattended for long periods.
The secret is a thin layer of white glue or fabric stiffener painted on the inside. Let it dry completely over a rounded object like a bottle to ensure it keeps its shape.
You can still use it! Just wrap the wire more densely around the umbrella pole or coil the excess neatly inside the body before you finish stuffing.
