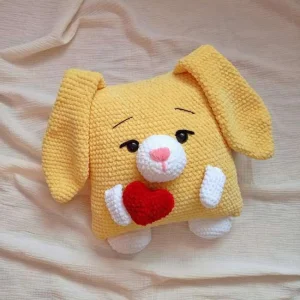
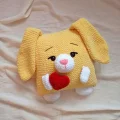
There's nothing quite like the squish of a plush yarn project, and this bunny pillow is the ultimate cozy companion for your home. I've designed this to be more than just a toy — it's a soft, huggable accent piece that looks just as sweet on a nursery shelf as it does snuggled up on your sofa. You'll love how the velvet texture brings the character to life with every stitch, making it a project you won't want to put down.
Progress Tracker
0% Complete
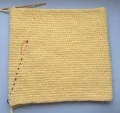
— 1. Main Pillow Body :
Round 2 :
Join the chain into a circle by making 1 sc in the first ch, then sc in each of the remaining 89 ch (90)
Round 3-40 :
sc in each of the 90 sts around (90)
Info :
At the end of the last round, work an additional 10 to 11 sc until you reach the corner edge of the pillow. Fasten off, leaving a long tail. Sew the top opening closed with your needle.
— 2. Muzzle :
Round 2 :
Starting in the second ch from your hook, work 2 sc, then 3 sc into the last ch. Turn to work along the bottom of the chain: 2 sc, 3 sc in the final ch (10)
Round 3 :
2 sc, inc in the next 3 sts, 2 sc, inc in the next 3 sts (16)
Round 4 :
(3 sc, inc) repeat 4 times (20)
Round 5 :
(4 sc, inc) repeat 4 times (24)
Round 6 :
(4 sc, inc) repeat 5 times (30)
Note :
The stitch count in Round 6 of the original pattern may be inconsistent; ensure you have 30 stitches before proceeding.
Round 7 :
(5 sc, inc) repeat 5 times (35)
Round 8 :
sc in each of the 35 sts (35)
Info :
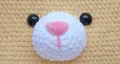
Fasten off and leave a tail for sewing. Use pink yarn to embroider the triangular nose onto the center of this piece.
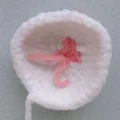
— 3. Bunny Ears :
Round 2 :
inc in every st around (12)
Round 3 :
(5 sc, inc) repeat 2 times (14)
Round 4 :
(6 sc, inc) repeat 2 times (16)
Round 5 :
(7 sc, inc) repeat 2 times (18)
Round 6 :
(8 sc, inc) repeat 2 times (20)
Note :
Source indicates 3 repeats for Round 6, but 2 repeats are required to reach the count of 20.
Round 7 :
inc, 8 sc, inc, inc, 8 sc, inc (24)
Round 8 :
inc, 9 sc, inc, inc, 10 sc, inc, inc (29)
Round 9 :
12 sc, inc, inc, 15 sc (31)
Round 10-15 :
sc in each of the 31 sts (31)
Round 16 :
14 sc, dec, 13 sc, dec (29)
Round 17 :
sc in each of the 29 sts (29)
Round 18 :
13 sc, dec, 12 sc, dec (27)
Round 19-20 :
sc in each of the 27 sts (27)
Round 21 :
12 sc, dec, 11 sc, dec (25)
Round 22 :
sc in each of the 25 sts (25)
Round 23 :
1 sc, dec, 11 sc, dec, 9 sc (23)
Round 24 :
sc in each of the 23 sts (23)
Round 25 :
1 sc, dec, 10 sc, dec, 8 sc (21)
Round 26 :
sc in each of the 21 sts (21)
Round 27 :
2 sc, dec, 8 sc, dec, 7 sc (19)
Round 28-38 :
sc in each of the 19 sts (19)
Info :
Fasten off and leave a long tail for sewing.
— 4. Arms :
Round 2 :
inc in every st around (12)
Round 3-9 :
sc in each of the 12 sts (12)
Note :
The source count of 14 for Round 9 is inconsistent; maintain 12 stitches throughout.
Finish :
Do not stuff the arms. Flatten the piece and sc through both layers (6 sc) to close. Fasten off with a long tail.
— 5. Legs :
Round 2 :
inc in every st around (12)
Round 3 :
(1 sc, inc) repeat 6 times (18)
Round 4 :
(2 sc, inc) repeat 6 times (24)
Round 5 :
(11 sc, inc) repeat 2 times (26)
Round 6 :
sc in each of the 26 sts (26)
Round 7 :
(11 sc, dec) repeat 2 times (24)
Round 8 :
sc in each of the 24 sts (24)
Finish :
Lightly stuff the legs. Flatten the opening and sc through both layers (12 sc) to close. Fasten off with a long tail.
— 6. Tail (Optional) :
Round 2 :
inc in every st around (12)
Round 3 :
(1 sc, inc) repeat 6 times (18)
Round 4 :
(2 sc, inc) repeat 6 times (24)
Round 5 :
(3 sc, inc) repeat 6 times (30)
Round 6 :
sc in each of the 30 sts (30)
Round 7 :
(3 sc, dec) repeat 6 times (24)
Info :
Fasten off, stuff firmly, and leave a tail for sewing.
I can't wait to see the bunnies you all create! This pattern is such a joy because you can really play with colors — imagine a soft mint or a dusty rose version. Once you finish yours, give it a big squeeze and find the perfect spot for it in your home. Don't forget to take your time with the face embroidery, as that's where the real personality shines through. Happy making, and enjoy your new snuggly friend! 🧶 ✨