About This Wild Boar Hand Puppet Amigurumi Pattern
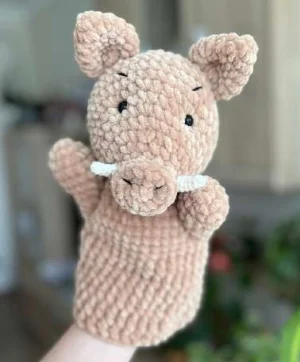
Whether you're making this for a classroom or as a special gift for a little one's birthday, this puppet is bound to be the star of every imaginary adventure and puppet show.
Ideal for those with basic crocheting experience, featuring slightly more advanced stitches and techniques to expand your skills.
Fits nicely into a free afternoon — 2 to 5 hours of focused, enjoyable crocheting.
Playful characters full of personality, designed to spark imagination and become cherished playtime favorites.
Whether you're making this for a classroom or as a special gift for a little one's birthday, this puppet is bound to be the star of every imaginary adventure and puppet show.
I'm a sucker for patterns where the arms are crocheted directly into the body—it saves so much sewing! Plus, using the bulky plush yarn means the main pieces grow so quickly.
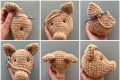
There's something so nostalgic about hand puppets, isn't there? I remember having a whole basket of them as a kid, and I wanted to recreate that magic with a modern, squishy twist. When I first started designing this boar, I wasn't sure if he'd look too 'wild,' but the plush yarn really softens him up.
One tip I've learned from making a dozen of these: don't be afraid to get expressive with the embroidery. The eyebrows can totally change his mood—tilt them down for a grumpy boar or up for a surprised one! I actually made a version of this in a soft grey yarn, and he looked just like a little forest friend.
If you're finding the arm join a bit fiddly, just take it slow. It's the most technical part of the whole project, but once you get past that round, it's smooth sailing with double crochets all the way to the finish line. It's such a satisfying project because you can literally see him start 'waving' at you as soon as the body is attached. I hope this pattern brings as much joy to your home as it has to mine!
I've always found that puppets bring so much life to storytime, and this little boar is no exception. You're going to love how the plush yarn makes him extra huggable while the cotton details give him that perfect character. Grab your hooks and let's make a new friend for your next puppet show!
Start with 6 sc into a MR (6)
Work 2 sc into every stitch around (12)
Repeat a sequence of 1 sc then an inc 6 times (18)
In the back loops only, repeat a pattern of 1 sc followed by a dec 6 times (12)
Work 1 sc in each stitch around (12)
Work a set of 2 sc then an inc 3 times, then finish with 3 sc (15)
Work a set of 3 sc then an inc 3 times, then finish with 3 sc (18)
Repeat a pattern of 1 sc then an inc 8 times, then add 2 sc at the end (26)
Work 1 sc in each stitch around (26)
Repeat a pattern of 2 sc then an inc 8 times, then add 2 sc at the end (34)
Work 1 sc in each stitch around (34)
Repeat a pattern of 3 sc then an inc 8 times, then add 2 sc at the end (42)
Work 1 sc in each stitch around for five consecutive rounds (42)
Repeat a sequence of 5 sc then a dec 6 times (36)
Repeat a sequence of 4 sc then a dec 6 times (30)
Repeat a sequence of 3 sc then a dec 6 times (24)
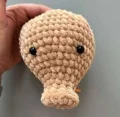
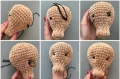
Place the safety eyes between Rounds 11 and 12. Make sure they are positioned 9 sc apart on the snout area. Once the eyes are secure, stuff the head firmly with fiberfill.
Repeat a sequence of 2 sc then a dec 6 times (18)
Repeat a sequence of 1 sc then a dec 6 times (12)
Work 6 dec around (6)
Thread your yarn tail through the front loops of the remaining stitches and pull tight to close. Fasten off and hide the end.
Make two ears using your beige plush yarn.
Start with 4 sc into a MR (4)
Work 2 sc into every stitch around (8)
Repeat a sequence of 1 sc then an inc 4 times (12)
Repeat a sequence of 2 sc then an inc 4 times (16)
Repeat a sequence of 3 sc then an inc 4 times (20)
Work 1 sc in each stitch around (20)
Repeat a pattern of 2 sc then a dec 5 times (15)
Cut the yarn, leaving a long tail for sewing later.
Make two fangs using the white cotton yarn and the smaller hook.
Start with 4 sc into a MR (4)
Work 1 sc in each stitch around (4)
Repeat a sequence of 1 sc then an inc twice (6)
Work 1 sc in each stitch around (6)
Repeat a sequence of 2 sc then an inc twice (8)
Work 1 sc in each stitch for two rounds (8)
Fasten off and leave a tail for attaching them to the snout.
Make two arms using beige plush yarn. Do not add stuffing.
Start with 6 sc into a MR (6)
Work 2 sc into every stitch around (12)
Repeat a pattern of 2 sc then an inc 4 times (16)
Work 1 sc in each stitch for two rounds (16)
Repeat a pattern of 2 sc then a dec 4 times (12)
Work 1 sc in each stitch for three rounds (12)
Finish with a sl st and cut the yarn.
We will work in continuous rounds. Leave a long starting tail for sewing the head on later.
Chain 24 and join with a sl st to the first chain to form a ring.
Work 1 sc into each chain around (24)
Repeat a sequence of 3 sc then an inc 6 times (30)
Repeat a sequence of 4 sc then an inc 6 times (36)
Repeat a sequence of 5 sc then an inc 6 times (42)
Join the first arm by working 7 sc through both the arm and the body, then work 13 sc on the body alone. Attach the second arm with 7 sc through both pieces, and finish the round with 15 sc on the body (42)
Work a sc2tog over the join, then 4 sc on the arm stitches, another sc2tog over the join, 12 sc on the body, a sc2tog over the join, 4 sc on the second arm, a sc2tog over the join, and 14 sc on the body (38)
Work a dec, 2 sc, another dec, then 12 sc. Follow this with a dec, 2 sc, another dec, and finish with 14 sc (34)
Work 1 sc in every stitch around, then ch 1 (34)
Work 1 dc into every stitch for the next six rounds (34)
Work 1 sc, then a sl st to finish. Cut your yarn and weave in the ends.
I can't wait to see the different personalities you give your boars! There's something so rewarding about finishing a puppet and seeing it come to life the moment you slip it on. Don't forget to share your finished photos with the community—we all love seeing your color choices and little embroidery tweaks. Happy hooking, and may your day be filled with cozy stitches and lots of creative joy! 🧶 ✨
Yes, velvet yarn works beautifully for this, though it can be a bit more slippery to work with than standard plush yarn.
The finished size is about 11 inches, which fits most adult hands comfortably, but you can always add a few more rounds of double crochet at the bottom if you need extra length.
Make sure you're doing the BLO round exactly as written in Round 4; that's what creates the flat 'end' of the nose.
You can, but 7mm gives that classic amigurumi look. If you go larger, you might need to adjust the indentation depth slightly.
