About This Yumi the Bicolor Dachshund Amigurumi Pattern
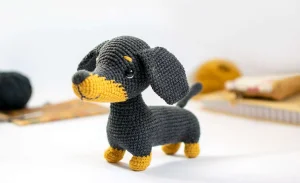
Yumi makes a genuinely thoughtful handmade gift for any dog lover — the kind of thing someone keeps on their desk for years and tells people about when they notice it.
Ideal for those with basic crocheting experience, featuring slightly more advanced stitches and techniques to expand your skills.
Fits nicely into a free afternoon — 2 to 5 hours of focused, enjoyable crocheting.
Delightful animal designs with sweet details that capture the essence of your favorite woodland and farmyard friends.
Yumi makes a genuinely thoughtful handmade gift for any dog lover — the kind of thing someone keeps on their desk for years and tells people about when they notice it.
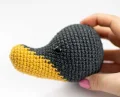
I love this one because the color changes aren't random — they follow the actual markings of a real bicolor dachshund, so as the rounds build up, you start to see an actual dog emerge from your hook. That moment when the snout shape starts to form in mustard against the black? Genuinely exciting. The leg construction is also clever — each of the four legs gets a slightly different Round 8 so they attach to the body at the right angle, and once you understand why, it makes so much sense. This is the kind of pattern that teaches you things without feeling like homework.
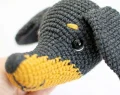
I have a real soft spot for dog amigurumi, and dachshunds specifically — there's something about crocheting that signature long silhouette that feels like a little magic trick. Yumi in bicolor is a whole different experience from the single-color version, though. The colorwork isn't complicated, but it asks you to stay present in a way I actually love about this pattern.
The head is where most of the action happens, and I'll be honest: the first time I looked at the color chart for rounds 6 through 21, I felt a flicker of 'oh, that looks like a lot.' But here's the thing — once you get into it, the color switching has a rhythm. You start to feel when the mustard is coming and when to prep the black, and suddenly you're not counting nervously, you're just... crocheting.
One thing I'd really encourage: use actual stitch markers in different colors for the legs, exactly as the pattern describes. It sounds fussy, but the pink, green, yellow, and blue system genuinely saves you from attaching a leg at the wrong angle. Ask me how I know.
If you want to make Yumi your own, you could try a chocolate and tan colorway instead of black and mustard — it gives a more classic dachshund look — or go full creative and use deep burgundy with cream for something a bit unexpected. The colorwork structure is the same regardless of which shades you choose, so it's an easy swap.
This is the kind of pattern that photographs beautifully when it's done, and I think that matters — you put real hours into handmade work and it deserves to look as good as it feels to make.
There's something about a dachshund that just gets people — that long little body, those floppy ears, that expression of total confidence despite being approximately six inches tall. Yumi captures every bit of that charm in crocheted form, and the bicolor version takes it even further with a striking black and mustard colorwork design that honestly looks impressive even before you've added the eyes. You'll be working in continuous spirals with color changes woven right into the rounds, which sounds intimidating but is actually one of those techniques that clicks fast and becomes really satisfying. This pattern is the bicolor addition to the main Yumi the Dachshund pattern, giving you all the pieces that differ from the single-color version.
All pieces are worked in continuous spirals — do not join rounds. Use a stitch marker to track your position. Begin with color B (mustard).
Color change method: when two loops of the current color remain on your hook, wrap the new yarn over the hook and pull it through both loops to complete the stitch. Always begin the color change one stitch before where you want the new color to appear.
Place 6 sc into a magic adjustable ring, then pull the tail firmly to close. (6 st)
(inc) 6x (12 st)
(sc, inc) 6x (18 st)
(2sc, inc) 6x (24 st)
sc in each st around (24 st)
From Round 6 onward, colors alternate within rounds. Remember to start each color change one stitch early.
B: 6sc, A: 4sc, B: 14sc (24 st)
B: 5sc, A: 6sc, B: 13sc (24 st)
B: 4sc, A: (dec, sc) 2x, dec, B: 12sc (21 st)
B: 3sc, A: 7sc, B: 4sc, (inc, 2sc) 2x, inc (24 st)
B: 3sc, A: 7sc, B: 14sc (24 st)
B: 2sc, A: 9sc, B: 13sc (24 st)
B: 2sc, A: 5sc, inc, 3sc, B: 4sc, inc, 7sc, inc (27 st)
B: 2sc, A: 10sc, B: 15sc (27 st)
B: sc, A: 12sc, B: 14sc (27 st)
B: sc, A: 7sc, inc, 5sc, B: 3sc, inc, 8sc, inc (30 st)
A: 16sc, B: 13sc, A: sc (30 st)
A: 4sc, (inc, sc) 4x, inc, 4sc, B: 11sc, A: 2sc (35 st)
A: 5sc, (inc, 2sc) 4x, inc, 5sc, B: 9sc, A: 3sc (40 st)
Round 19 is where you mark positions for the safety eyes using a contrast thread.
A: 4sc, mark this point for the first eye with a contrast thread, 19sc, mark this point for the second eye, 6sc, B: 7sc, A: 4sc (40 st)
A: (inc, 3sc, inc, 7sc) 2x, inc, 3sc, inc, sc, B: 5sc, A: 5sc (46 st)
A: 37sc, B: 3sc, A: 6sc (46 st)
From Round 22 onward, use color A only.
sc, (inc, 4sc, inc, 8sc) 2x, inc, 4sc, inc, 11sc (52 st)
sc in each st around (52 st)
sc in each st around (52 st)
sc in each st around (52 st)
sc in each st around (52 st)
sc in each st around (52 st)
sc in each st around (52 st)
sc in each st around (52 st)
Now is the best time to insert the safety eyes at the marked positions from Round 19. Begin stuffing the head and continue adding stuffing as you work the remaining rounds.
(11sc, dec) 4x (48 st)
3sc, (dec, 6sc) 5x, dec, 3sc (42 st)
(5sc, dec) 6x (36 st)
2sc, (dec, 4sc) 5x, dec, 2sc (30 st)
(3sc, dec) 6x (24 st)
sc, (dec, 2sc) 5x, dec, sc (18 st)
(sc, dec) 6x (12 st)
(dec) 6x (6 st)
Fasten off, leaving a long tail. Thread the tail through the front loop of each remaining stitch with a tapestry needle and pull snug to close the opening. Weave in the end securely.
Start with color A (black).
ch10, sc in the 2nd ch from hook and across the next 7 chains, work inc in the last chain st, then rotate and continue along the other side of the chain: 8sc, inc in the last st (20 st)
sc in each st around (20 st)
sc in each st around (20 st)
(9sc, inc) 2x (22 st)
(10sc, inc) 2x (24 st)
(11sc, inc) 2x (26 st)
(12sc, inc) 2x (28 st)
sc in each st around (28 st)
sc in each st around (28 st)
sc in each st around (28 st)
sc in each st around (28 st)
sc in each st around (28 st)
sc in each st around (28 st)
(12sc, dec) 2x (26 st)
(11sc, dec) 2x (24 st)
(10sc, dec) 2x (22 st)
(9sc, dec) 2x (20 st)
(8sc, dec) 2x (18 st)
(7sc, dec) 2x (16 st)
Work 3sc, then flatten the ear so the edges line up, and sc through both layers for the remaining 8 stitches to the end (8 st through both sides)
Fasten off and cut yarn, leaving a long tail for sewing the ear to the head.
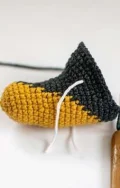
Start with color B (mustard). All four legs follow the same rounds 1–7, then Round 8 differs for each leg. Read the Round 8 note for each leg carefully before fastening off.
ch5, sc in the 2nd ch from hook and across the next 2 chains, work 3sc in the last chain st, then rotate and continue along the other side: 3sc, 3sc in the last st (12 st)
(3sc, 3inc) 2x (18 st)
Working through back loops only this entire round: sc in each st around (18 st)
sc in each st around (18 st)
sc, 6dec, 5sc (12 st)
sc in each st around (12 st)
Switch to color A (black) for Round 7 onward.
2sc, 3inc, 7sc (15 st)
Round 8 is different for each of the four legs. Work the correct version for each leg as instructed below, then slst, fasten off, cut yarn, and attach the corresponding colored stitch marker to the 3rd stitch from the last slst.
3sc, (inc, sc) 2x, inc, 7sc. Make slst, fasten off, cut yarn. Attach a pink marker on the 3rd st from the last slst.
3sc, (inc, sc) 2x, inc. Make slst, fasten off, cut yarn. Attach a green marker on the 3rd st from the last slst.
3sc, (inc, sc) 2x, inc, sc. Make slst, fasten off, cut yarn. Attach a yellow marker on the 3rd st from the last slst.
3sc, (inc, sc) 2x, inc, 7sc. Make slst, fasten off, cut yarn. Attach a blue marker on the 3rd st from the last slst.
After completing all four legs, continue with the body section from the main Yumi the Dachshund pattern, substituting the colors used in this bicolor version throughout.
Eye indentation: Thread a length of color A yarn onto a tapestry needle. Enter from underneath the head at the level of Round 25, bring the needle out right beside one eye, pass it back through on the opposite side of that eye, then return the needle down through the bottom of the head one stitch away from where it entered. Repeat for the second eye, re-entering from the same bottom points. Pull all yarn ends firmly and tie a secure knot to set the eye depth, then bury the ends inside the head.
Nose embroidery: Using color A yarn, embroider a nose shape on the top of the head between Rounds 1 and 7. The nose measures 5sc tall, 3sc across the lower edge, and 7sc across the upper edge.
Mouth embroidery: Embroider a vertical line from the base of the nose down to Round 3 on the underside of the head. From the bottom of this line, stitch a smile curving outward to each side, spanning between Rounds 3 and 8 of the head.
Eyebrow embroidery: Using color B (mustard) yarn, make 2 small yarn loops above each eye, positioned between Rounds 20 and 22 of the head. Each eyebrow is 2sc wide and 1sc tall.
Under-eye detail: Using color C (white) yarn, embroider a short line beneath each eye for highlight definition.
Yumi is one of those projects that surprises you — you start thinking it's just a cute little dog, and somewhere around Round 16 of the head, when the mustard snout is really taking shape against all that black, you realize you're making something genuinely beautiful. 🧶 The bicolor colorwork feels advanced but the actual technique is just mindful color switching, and once it clicks, you'll fly through the rounds. Whether Yumi ends up on a bookshelf, tucked into a gift bag, or handed off to a dachshund-obsessed friend, she's going to turn heads. Give yourself the afternoon, put on something good to listen to, and enjoy every round. ✨
Yes — this PDF is an addition to the main pattern, not a standalone. It covers the head, ears, and legs with the bicolor colorwork, but refers you back to the main pattern for the body and assembly. You'll need both to complete the finished dog.
You can substitute yarn weight, but the finished size will increase noticeably — worsted on a 2mm hook would be very stiff and likely unusable. If you go up in weight, use an appropriately larger hook and expect the toy to come out roughly 20–30% bigger than the listed 7.5 inch height.
When you're one stitch before where you want the new color to appear, complete the sc up to the final pull-through — instead of finishing with the old color, wrap your new yarn over the hook and use it to complete that last pull-through. The new color will then begin cleanly on the following stitch.
Each leg needs a slightly different stitch count on Round 8 so that when attached to the body, they angle correctly — front legs and back legs sit at different positions, and the right and left legs of each pair mirror each other. The colored markers help you keep track of which is which during assembly.
After Round 32 of the head, once you've started decreasing and begun stuffing — the pattern specifically notes this as the ideal moment. The eye positions were marked in Round 19 with contrast thread, so you'll have clear reference points. Don't wait until the head is almost closed or inserting the backs of the safety eyes becomes very difficult.
